Why We Start With MDM
Before configuring or troubleshooting anything in Chromebook Panic, it’s essential to understand Mobile Device Management (MDM) — the foundation of how your organization controls and secures its Chromebooks.
In this setup, the MDM is the Google Admin Console. Once Chromebooks are enrolled under the Google Workspace domain, the Admin Console becomes the command center for all management tasks.
Through MDM, you determine:
-
Who can access the device
-
Which apps and extensions are installed
-
What networks the Chromebook connects to
-
How and when software updates occur
Starting with MDM ensures every Chromebook is enrolled, compliant, and connected, which is critical for Chromebook Panic to function properly.
Locating the EducationShield Chrome Extension
In the Google Admin Console, navigate to:
Devices → Chrome → Apps & Extensions..
You should see EducationShield Chrome listed under the Overview tab if it has been added.
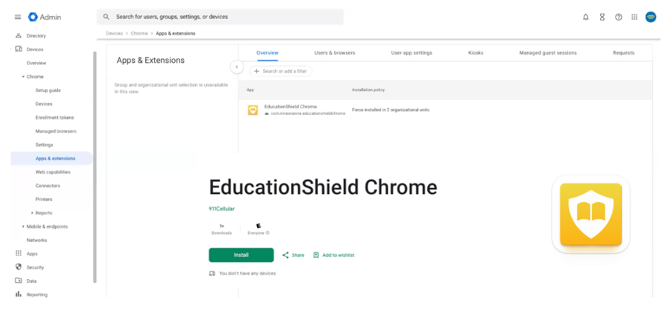
If EducationShield Chrome does not appear, you’ll first need to add it from the Google Play Store (managed apps).
Next, click the Users and Browsers tab to select the appropriate Organizational Unit (OU) to view which apps are currently deployed. Once added and applied, the app will appear in your Admin Console and sync to enrolled Chromebooks under those OUs.
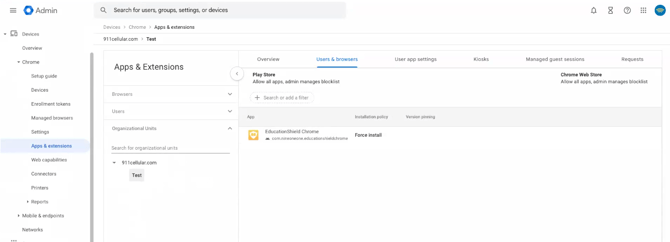
Deploying EducationShield Chrome
In the Google Admin Console, navigate to:
Devices → Chrome → Apps & extensions → Users & browsers
-
In Users & browsers, select the Organizational Unit (OU) where you want the app deployed (e.g.,
911cellular.com→Test). -
Click + Add → Add from Google Play Store, search EducationShield Chrome, and select it.
-
Set Installation policy to Force install for the chosen OU.
Force-installing the app ensures Chromebook users cannot turn off the location permissions required for ChromebookShield to function properly.
-1.png?width=670&height=238&name=image%20(1)-1.png)
You can also select Force install + pin to ChromebookOS taskbar to ensure users can efficiently access the app, and aren't able to remove it from the taskbar.
-
(Optional) Repeat for additional OUs (e.g., Students, Teachers, per-school groups) if you want it everywhere.
-
Click Save. The extension will auto-install on enrolled Chromebooks in the selected OU(s) after the next policy sync.
Deployment scope is controlled by OUs. Most orgs have multiple OUs (Students, Teachers, Schools). Apply Force install to each OU that needs EducationShield.
‼️ Required Admin Action: Add the (institution_id)
After you Force install EducationShield Chrome for the target OU(s), set the managed configuration so devices know which institution to associate with.
Devices → Chrome → Apps & extensions → Users & browsers
Select OU: (e.g., Students, Teachers, or Test) → click EducationShield Chrome
In the right panel → Managed configuration, paste your institution ID JSON and Save:
{"institution_id": 1020}
What this does
-
Directs the Chromebook to the correct server endpoints for your institution.
-
Authenticates the device.
-
Enables communication when the device is connected to an approved network (BSSID match).
-
Allows EducationShield functions (e.g., screen takeovers and, if configured, panic signals).
Next:
Pinning EducationShield Chrome App to the System Tray
Triggering Alerts on Panic-Enabled Chromebooks